Wintempla Import COM Library |
One of the main problems of using COM is learning how to use a set of classes, interfaces and functions that the programmer did not created. The second problem is produce because the compiler cannot detect a data-type error when using _variant_t variables. To ease the use of COM in a C++ program, Wintempla provides a tool to create:
Uno de los principales problemas de usar COM es aprender cómo usar un conjunto de clases, interfaces y funciones que el programador no creo. El segundo problema es producido porque el compilador no puede detectar errores de tipo de datos cuando se usan las variables del tipo _variant_t. Para simplificar el uso de COM en un programa de C++, Wintempla proporciona una herramienta para crear:
|
| Problem 1 |
| Create a Wintempla dialog application called Days to create a Microsoft Word document call days.docx. Type the following code and execute the program. Cree una aplicación de diálogo de Wintempla llamada Days para crear un documento de Microsoft Word llamado days.docx. Escriba el código siguiente y ejecute el programa. |
| Days.cpp |
| ... void Days::Window_Open(Win::Event& e) { Com::Boot boot; // it internally calls ::CoInitialize and ::CoUninitialize Com::Object Application; Com::Object Documents; try { Application.CreateInstance(L"Word.Application", true); Application.Get(L"Documents", Documents); //___________________________________________ Create a C++ class from the IDispatch interface of Documents Documents.CreateClassFiles(L"Ms"); // Application.Method(L"Quit"); } catch (Com::Exception excep) { excep.Display(hWnd, L"Days"); Application.Method(L"Quit"); } } |
| Step A |
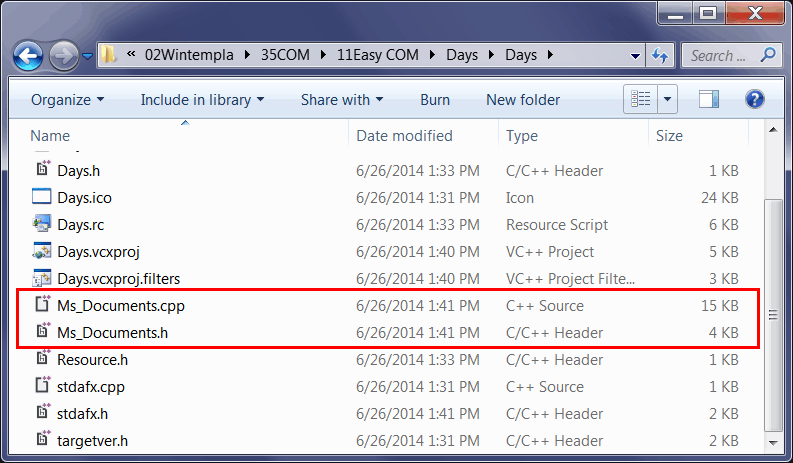
The program will create the files Ms_Documents.h and Ms_Documents.cpp. This class is derived from Com::Object, thus you can use it as any regular Com::Object, however, the derived class implements the specific functions of the interface. Add these file to your project:
|
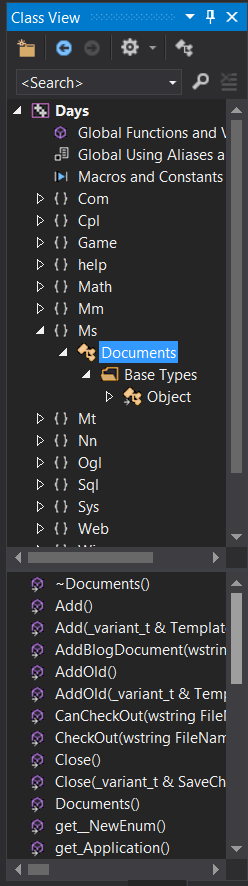
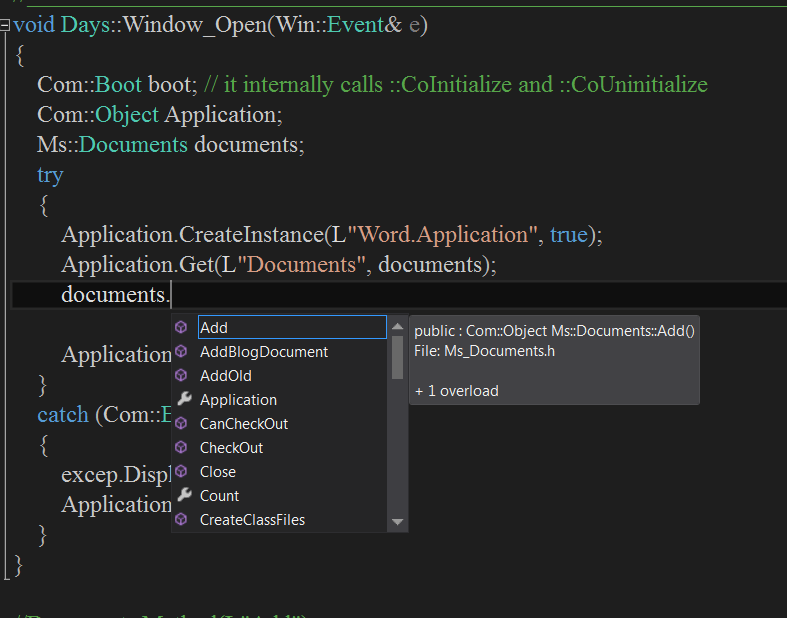
| Tip |
| After adding these files, Microsoft Visual Studio will provide assistance to the programmer as shown in the figure. Después de agregar estos archivos, Microsoft Visual Studio proporcionará asistencia al programador como se muestra en la figura. |
| Step B |
| Edit the Days.cpp file as shown. Do not forget to include the Ms_Documents.h file. Edite el archivo Days.cpp como se muestra. No se olvide de incluir el archivo Ms_Documents.h. |
| Days.cpp |
| #include "stdafx.h" //________________________________________ Days.cpp #include "Days.h" #include "Ms_Documents.h" .. . void Days::Window_Open(Win::Event& e) { Com::Boot boot; // it internally calls ::CoInitialize and ::CoUninitialize Com::Object Application; Ms::Documents documents; Com::Object document; try { Application.CreateInstance(L"Word.Application", true); Application.Get(L"Documents", documents); document = documents.Add(); Application.Method(L"Quit"); } catch (Com::Exception excep) { excep.Display(hWnd, L"Days"); Application.Method(L"Quit"); } } |
| Tip |
| You can proceed now to create a C++ class for the Document object. Once you have created these class you can store them for future use. Using this method, it is possible to create one C++ class for each IDispatch interface. This method is useful to simplify the programming of the use of an IDispatch interface. Usted puede proceder ahora a crear una clase de C++ para el objeto de Documento. Una vez que usted ha creado estas clases las puede guardar para su uso futuro. Usando este método es posible crear una clase de C++ a la vez. Este método es útil para simplificar el uso de una interface IDispatch. |
| Step C |
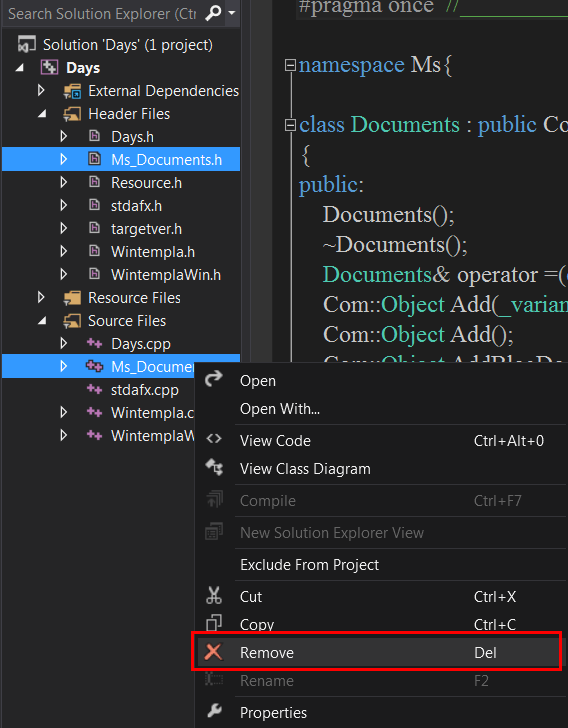
| From Solution Explorer use the context menu to remove (and delete) the previously created files: Ms_Documents.h and Ms_Documents.cpp. Desde Solution Explorer use el menú de contexto para remover (y borrar) los archivos creados previamente: Ms_Documents.h and Ms_Documents.cpp. |
| Step D |
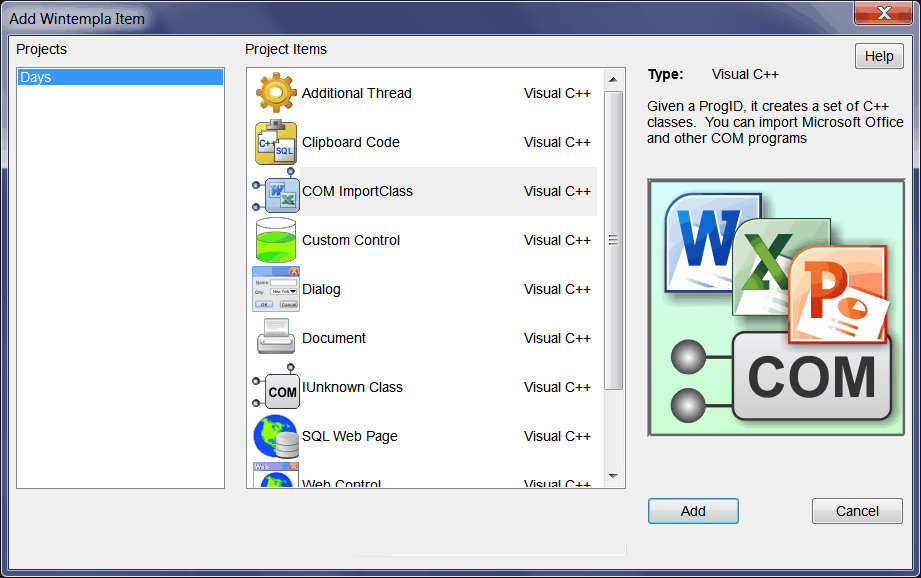
We will import all COM classes included in the Word.Application library. From the menu: Tools > Add Wintempla item... and select "COM Import Class". To import a COM library programmatically, you can use the methods:
Importaremos todas las clases COM incluidas en la librería Word.Application. Desde el menú: Tools > Add Wintempla item... y seleccione "COM Import Class". Para importar una librería COM en forma programática, usted puede usar los métodos:
|
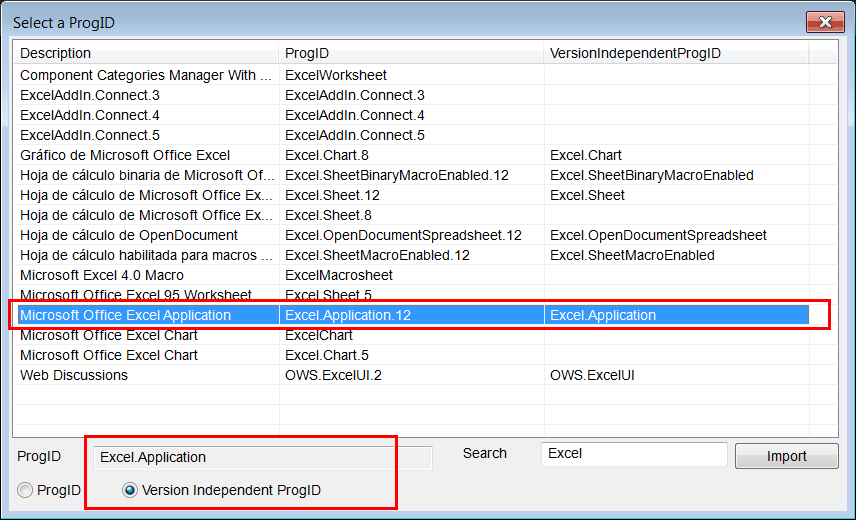
| Step E |
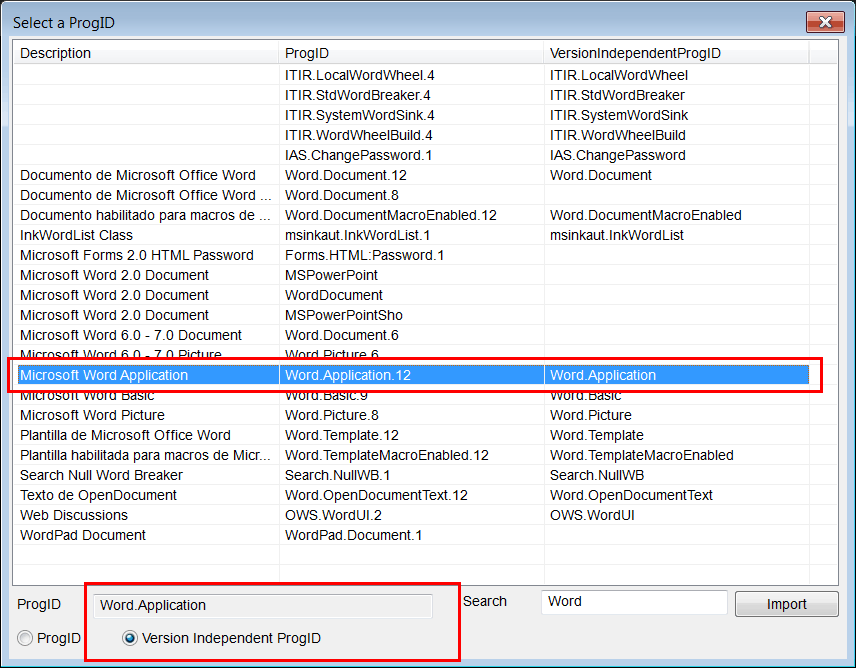
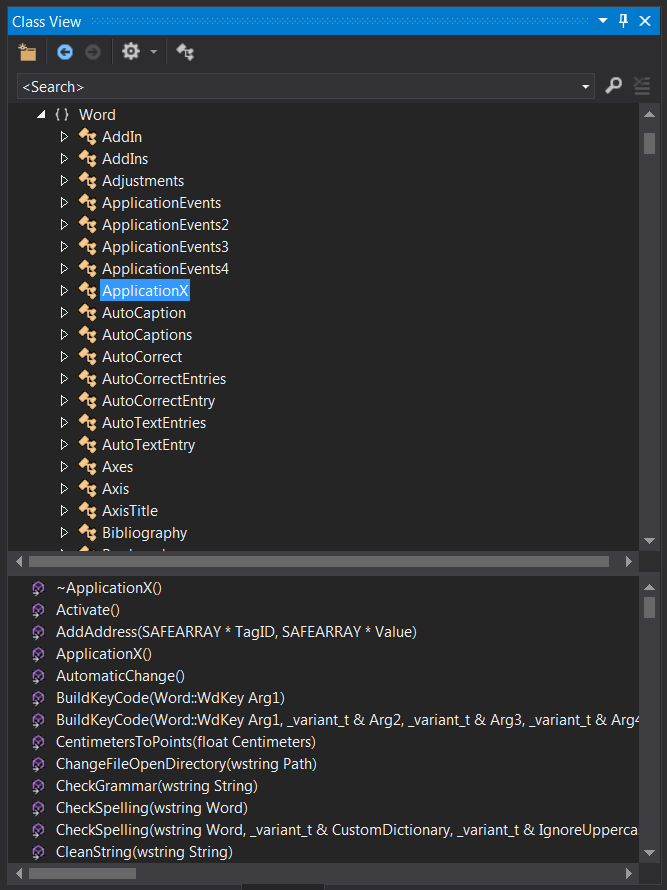
| Press the Add button and wait until the COM components dialog displays. Look for Word.Application as shown. Press the Import button. You can check in Class View that all classes in the library are displayed inside the namespace MsWord. As these class files are auto generated, there may be name clashes or errors; you might need to edit these manually. In some cases the import tool will add an X at the end of the class, property or function to try to avoid name conflicts. Presione el botón de Add y espere hasta que el diálogo de componentes COM aparezca. Busque Word.Application como se muestra. Presione el botón de Import. Usted puede verificar que todas las clases en la librería aparecen dentro del namespace MsWord. Como estos archivos de clases son generados automáticamente, estos pueden tener conflictos con los nombres o errores; usted podría necesitar editar estos archivos manualmente. En algunos casos la herramienta importadora agregará una X al final del nombre de la clase, propiedad o función para tratar de evitar conflictos de nombre. |
| Step E |
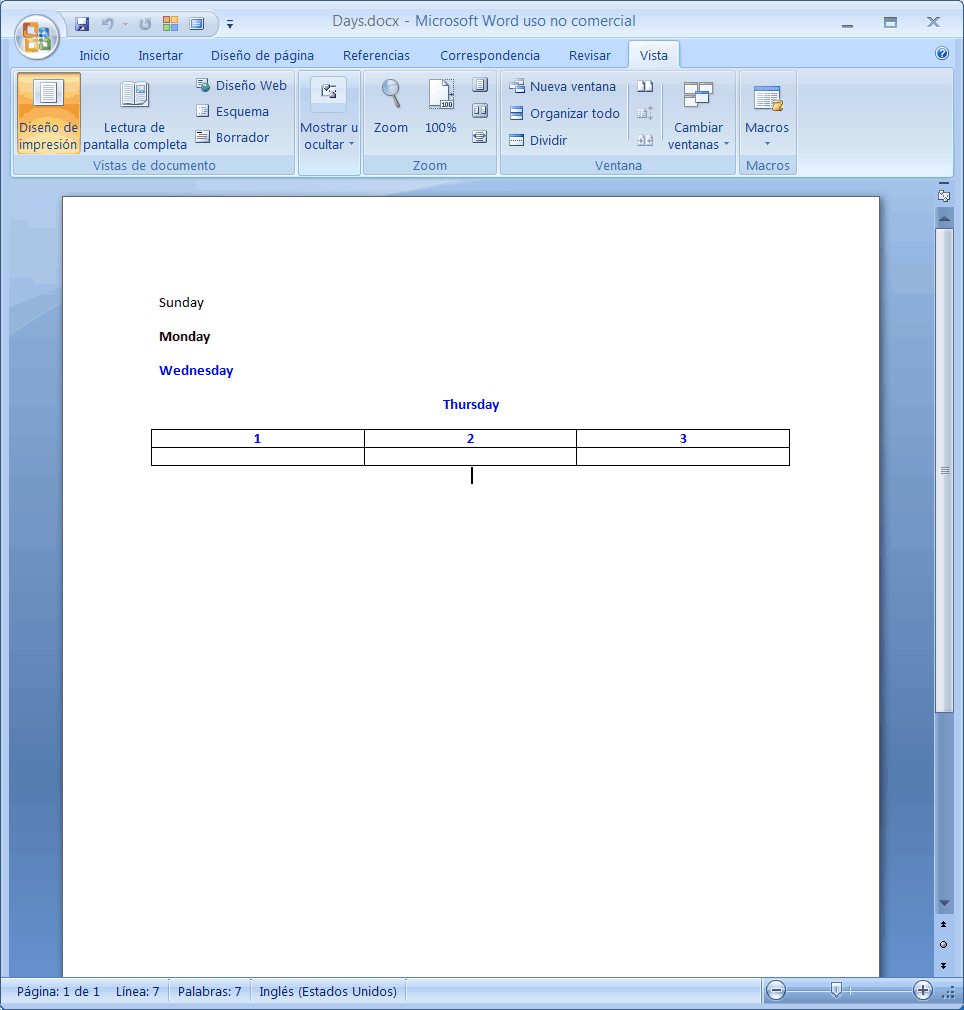
| Edit the Days.cpp file as shown. When done, run the program and open the Microsoft Word file that was created by the program: Days.docx. Edite el archivo Days.cpp como se muestra. Cuando termine, corra el programa y abra el archivo de Microsoft Word que fue creado por el programa: Days.docx. |
| Days.cpp |
| #include "stdafx.h" //________________________________________ Days.cpp #include "Days.h" #include "Word.h" ... void Days::Window_Open(Win::Event& e) { Com::Boot boot; // it internally calls ::CoInitialize and ::CoUninitialize Word::ApplicationX application; Word::Documents documents; Word::DocumentX document; _variant_t vtEmpty; _variant_t vtFalse(false); _variant_t emptyText(L""); const short Office_MsoEncoding_msoEncodingAutoDetect = (short)50001; try { application.CreateInstance(L"Word.Application", true); application.Visible = true; documents = application.DocumentsX; document = documents.Add(); //_________________________________________ Selection Word::Selection selection = application.SelectionX; selection.TypeText(L"Sunday"); selection.TypeParagraph(); //_________________________________________ Bold Word::FontX font = selection.Font; font.Bold = true; selection.TypeText(L"Monday"); selection.TypeParagraph(); //_________________________________________ Blue font.ColorIndex = Word::WdColorIndex::wdBlue; selection.TypeText(L"Wednesday"); selection.TypeParagraph(); //__________________________________________ Center Word::ParagraphFormatX paragraphFormat = selection.ParagraphFormat; paragraphFormat.Alignment = Word::WdParagraphAlignment::wdAlignParagraphCenter; selection.TypeText(L"Thursday"); selection.TypeParagraph(); //__________________________________________ Table _variant_t vtDefaultTableBehavior((short)Word::WdDefaultTableBehavior::wdWord9TableBehavior); _variant_t vtAutoFitBehavior((short)Word::WdAutoFitBehavior::wdAutoFitWindow); Word::Range range = selection.RangeX; Word::Tables tables = document.TablesX; Word::Table table = tables.Add(range, 2, 3, vtDefaultTableBehavior, vtAutoFitBehavior); //__________________________________________ Fill Table _variant_t moveCount; _variant_t unitsLine((short)Word::WdUnits::wdLine); _variant_t unitsChar((short)Word::WdUnits::wdCharacter); _variant_t movementType((short)Word::WdMovementType::wdMove); selection.TypeText(L"1"); moveCount = 1; selection.MoveRight(unitsChar, moveCount, movementType); selection.TypeText(L"2"); selection.MoveRight(unitsChar, moveCount, movementType); selection.TypeText(L"3"); // document.SaveAs(_variant_t(L"C:\\selo\\Days.docx"), //FileName _variant_t((short)Word::WdSaveFormat::wdFormatXMLDocument), //FileFormat vtFalse, //LockComments, emptyText, //Password vtFalse, //AddToRecentFiles emptyText, //WritePassword vtFalse, //ReadOnlyRecommended vtFalse, //EmbedTrueTypeFonts vtFalse, //SaveNativePictureFormat vtMissing, //SaveFormsData vtFalse, //SaveAsAOCELetter _variant_t(Office_MsoEncoding_msoEncodingAutoDetect), //Encoding vtMissing, //InsertLineBreaks vtMissing, //AllowSubstitutions vtMissing, //LineEnding vtMissing); //AddBiDiMarks application.Quit(); } catch (Com::Exception excep) { excep.Display(hWnd, L"Days"); application.Quit(); } } |
| Problem 2 |
| Create a Wintempla dialog application called Months to create a Microsoft Excel document call months.xlsx. After creating the project add a Wintempla Item. Select COM Import Class. After selecting Microsoft Excel Library, press the Import button. Cree una aplicación de diálogo de Wintempla llamada Months para crear un documento de Microsoft Excel llamado months.xlsx. Después de crear el proyecto agregue un artículo de Wintempla. Seleccione COM Import Class. Después de seleccionar Microsoft Excel Library, presione le botón de Import. |
| Step A |
| Edit the Months.cpp file as shown. When done, run the program and open the Microsoft Excel file that was created by the program: Months.docx. Edite el archivo Months.cpp como se muestra. Cuando termine, corra el programa y abra el archivo de Microsoft Excel que fue creado por el programa: Months.docx. |

| Months.cpp |
| #include "stdafx.h" //________________________________________ Months.cpp #include "Months.h" #include "Excel.h" . . . void Months::Window_Open(Win::Event& e) { Com::Boot boot; // it internally calls ::CoInitialize and ::CoUninitialize Excel::ApplicationX application; try { application.CreateInstance(L"Excel.Application", true); //application.Visible = true; //Com::Container::DisplayInterfaceFunctions(hWnd, application); //________________________________________________ Add a Workbook Excel::Workbooks workbooks = application.WorkbooksX; Excel::WorkbookX workbook = workbooks.Add(Excel::XlSheetType::xlWorksheet); //____________________________________________________________ Set the name of the worksheet Excel::WorksheetX worksheet = application.ActiveSheet; worksheet.NameX = L"Months of the Year"; //____________________________________________________________ Set the value of the A1 Cell Excel::Range range = worksheet.get_Range(L"A1"); range.Value2 = L"January"; //_____________________________________________________________ Set cells Excel::Range cells = worksheet.Cells; cells.get_Item(1, 1); _variant_t item = cells.get_Item(2, 1); Excel::Range cell = item; cell.put_Value2(L"February"); //_____________________________________________________________ Change the color cell = cells.get_Item(3, 1); cell.put_Value2(L"March"); Excel::Font font = cell.FontX; font.ColorIndex = 3; // worksheet.SaveAs(L"C:\\selo\\Months.xlsx", // Filename (short)Excel::XlFileFormat::xlOpenXMLWorkbook, L"", //Password L"", //WriteResPassword false, //ReadOnlyRecommended false, //CreateBackup false, // AddToMru vtMissing, //TextCodepage vtMissing, //TextVisualLayout vtMissing //Local ); application.Quit(); } catch (Com::Exception excep) { wchar_t text[1024]; excep.GetErrorText(text, 1024); this->MessageBox(text, L"Months", MB_OK | MB_ICONERROR); application.Quit(); } } |